Pages

Sunday, December 25, 2011

Using Malwares For Hacking

ProRat
To show you an example of a malicious program, I will use a well known Windows Trojan, ProRat.

1. Download ProRat. Once it is downloaded right click on the folder and choose to extract it. A password prompt will come up. The password will be "
pro".
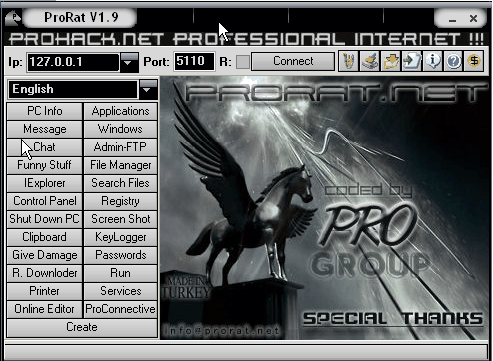
2. Open up the program. You should see the following:


3. Next we will create the actual Trojan file. Click on Create and choose Create ProRat Server.

4. Next put in your IP address so the server could connect to you. If you don’t know your IP address click on the little arrow to have it filled in for you automatically. Next put in your e-mail so that when and if a victim gets infected it will send you a message. We will not be using the rest of the options.


5. Click on the General Settings button to continue. Here we will choose the server port the program will connect through, the password you will be asked to enter when the victim is infected and you wish to connect with them, and the victim name. As you can see ProRat has the ability to disable the windows firewall and hide itself from being displayed in the task manager.

6. Click on the Bind with File button to continue. Here you will have the option to bind the trojan server file with another file. Remember a trojan can only be executed if a human runs it. So by binding it with a legitimate file like a text document or a game, the chances of someone clicking it go up. Check the bind option and select a file to bind it to. In the example I will use an ordinary text document.


7. Click on the Server Extensions button to continue. Here you choose what kind of server file to generate. I will stick with the default because it has icon support, but exe’s looks suspicious so it would be smart to change it.
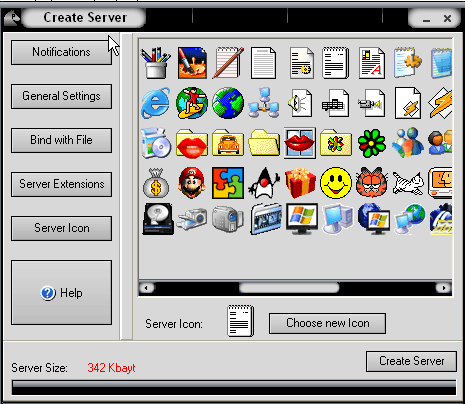


8. Click on Server Icon to continue. Here you will choose an icon for your server file to have. The icons help mask what the file actually is. For my example I will choose the regular text document icon since my file is a text document.


9. Finally click on Create Server to, you guessed it, create the server file. Below is what my server file looks like.


10. A hacker would probably rename it to something like "Funny Joke" and send it as an attachment to some people. A hacker could also put it up as a torrent pretending it is something else, like the latest game that just came out so he could get people to download it.

11. Now, I will show you what happens when a victim installs the server onto his computer and what the hacker could do next.

12. I’m going to run the server on my own computer to show you what would happen. Once I run it the trojan will be installed onto my computer in the background. The hacker would then get a message telling him that I was infected. He would then connect to my computer by typing in my IP address, port and clicking Connect. He will be asked for the password that he made when he created the server. Once he types it in, he will be connected to my computer and have full control over it.
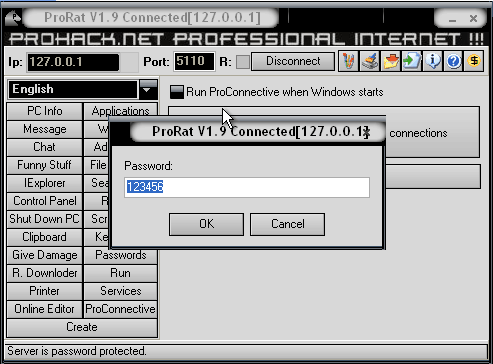
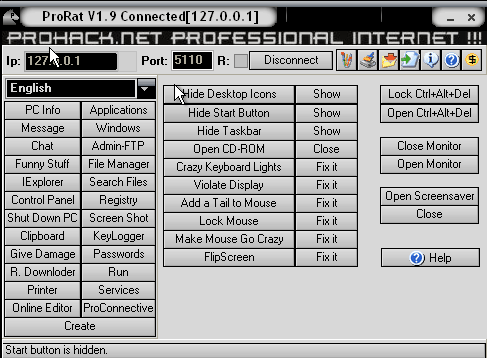


13. Now the hacker has a lot of options to choose from as you can see on the right. He has access to all my computer files, he can shut down my pc, get all the saved passwords off my computer, send a message to my computer, format my whole hard drive, take a screen shot of my computer, and so much more. Below I’ll show you a few examples.


14. The image below shows the message I would get on my screen if the hacker chose to message me.


15. Below is an image of my task bar after the hacker clicks on Hide Start Button.
                            

16. Below is an image of what the hacker would see if he chose to take a screen shot of the victims screen.


As you saw in the above example, a hacker can do a lot of silly things or a lot of damage to the victim. ProRat is a very well known trojan so if the victim has an anti-virus program installed he most likely won’t get infected. Many skilled hackers can program their own viruses and Trojans that can easily bypass anti-virus programs.

Countermeasures:
There are a couple things you can do to prevent yourself from being infected by the malware discussed in this post.

1. Make sure you have good and up-to-date anti-virus software installed on your computer. Also if there is an automatic update option on your anti-virus software, make sure it is enabled.

2. Make sure you have a firewall installed on your computer and make sure that it is actually enabled. Firewalls protect against unauthorized inbound and outbound connections.

Thursday, December 15, 2011

How to Change the "Shutting down.." Text Message at Shutdown in Windows 7 and Vista

Change "Shutting down..." Text Message at Shutdown.

                                           Before

After

Now lets coming to point -"How to do this??"
Follow the steps below to do this-
1. In Windows Explorer, navigate to C:\Windows\System32\en-US\wininit.exe.mui. (see screenshot below)

Note Note


The en-US folder is in English Windows 7 copies. If you have a non-English Windows 7 copy, then this folder will have a different name reflecting your language instead.The table below are a few of the most common ones.
Folder Name Language
da-DK Danish
en-GB English-Great Britian
en-US English-U.S.
fi-FI Finnish
fr-FR French
de-DE German
el-GR Greek
it-IT Italian
no-NO Norwegian
es-ES Spanish
sv-SE Swedish


2. Take Ownership of the wininit.exe.mui file with your user account, and set it's permissions to Allow your user account Full Control. Close Windows Explorer when finished.


3. Copy this wininit.exe.mui file to your desktop.

4. If you have not already, download and install Resourse Hacker.

5. Right click on the Resource Hacker shortcut in Start Menu - All Programs, then click on Run as administrator. (see screenshot below)


6. If prompted by UAC then click on Yes (Windows 7) or Continue (Vista).

7. In Resource Hacker, click on File and Open. (see screenshot below)


8. In Resource Hacker, select All Files (*.*) in the Files of type drop down box, navigate to and select the copied wininit.exe.mui file on the desktop,then click on the Open button. (see screenshot below)


9. In the left pane of Resource Hacker, expand String Table, and 63, to 1003. (see screenshot below)


10. In the right pane of 1002, replace the Shutting down... text in quotes at 1003 with the text you want instead (ex: Turning off computer...) within quotes, then click on the Compile Script button. (see screenshot above and below)

1
1. Click on File and Save, then close Resource Hacker. (see screenshot below)

12. Copy the modified wininit.exe.mui file on your Desktop, and Paste it into the C:\Windows\System32\en-US folder from step 1. (see screenshot below step 1)
NOTE: The en-US folder is in English Windows 7 copies. If you have a non-English Windows 7 copy, then this folder will have a different name reflecting your language instead.

13. Click on Copy and Replace. (see screenshot below)

14. Restart the computer and log in to see the changes made.

Tip Tip
If the "Shutting down..." message did not change at shutdown (in second shutdown) after your changes from above, then:

1) Open a elevated command prompt i.e open cmd and run as administrator

2) In the command prompt, type mcbuilder and press Enter.

3) When the command window closes, restart the computer.

15. You can delete the wininit.exe_original.mui that ResHacker created if you like since you can easily do OPTION TWO below to restore the default settings.


Thats it!! Hope you have done successfully !!

Saturday, December 10, 2011

How to Change the Start Menu Button in Windows 7

Changing your Start button is very easy and simple.

Steps to change your Start button-

  1. Download the Windows 7 Start Orb Changer from the link.
  2. Run the tool as administrator.
    Windows 7 Start Orb Changer
  3. Click Change.
    Windows 7 Start Orb Changer
  4. Select the start orb and click Open. You can get some orbs from these links:1, 2, 3, 4, 5, 6, 7, 8, 9, 10, 11, 12.(Save the orbs with extension of .bmp or directly download from the link)
     5. The Windows Explorer will now restart automatically and you will be able to see the new start orb/button which you choose. Click OK.


To restore the original start orb click Restore.

Friday, December 9, 2011

How to Change the "Welcome" Text Message at Log On in Windows 7 and Vista

Change "Welcome" Text Message at Log On
1. In Windows Explorer, navigate to C:\Windows\System32\en-US\winlogon.exe.mui. (see screenshot below)
Note Note

The en-US folder is in English Windows 7 copies. If you have a non-English Windows 7 copy, then this folder will have a different name reflecting your language instead.The table below are a few of the most common ones.
Folder Name Language
da-DK Danish
en-GB English-Great Britian
en-US English-U.S.
fi-FI Finnish
fr-FR French
de-DE German
el-GR Greek
it-IT Italian
no-NO Norwegian
es-ES Spanish
sv-SE Swedish


2. Take Ownership of  the winlogon.exe.mui file with your user account, and set it's permissions to Allow your user account Full Control. Close Windows Explorer when finished.


3. Copy this winlogon.exe.mui file to your desktop.

4. If you have not already, download and install Resourse Hacker.

5. Right click on the Resource Hacker shortcut in Start Menu - All Programs, then click on Run as administrator. (see screenshot below)

 6. If prompted by UAC then click on Yes (Windows 7) or Continue (Vista).

7. In Resource Hacker, click on File and Open. (see screenshot below)

8. In Resource Hacker, select All Files (*.*) in the Files of type drop down box, navigate to and select the copied winlogon.exe.mui file on the desktop,then click on the Open button. (see screenshot below)


9. In the left pane of Resource Hacker, expand String Table, and 63, to 1033. (see screenshot below)


10. In the right pane of 1033, replace the Welcome text in quotes at both 1002 and 1005 locations with the text you want instead (ex: Hello) within quotes, then click on the Compile Script button. (see screenshot above and below)

11. Click on File and Save, then close Resource Hacker. (see screenshot below)

12. Copy the modified winlogon.exe.mui file on your Desktop, and Paste it into the C:\Windows\System32\en-US folder from step 1. (see screenshot below step 1)
NOTE: The en-US folder is in English Windows 7 copies. If you have a non-English Windows 7 copy, then this folder will have a different name reflecting your language instead.


13. Click on Copy and Replace. (see screenshot below)

14. Restart the computer and log in to see the changes made.

Tip Tip
If the "Welcome" message did not change at log on after your changes from above, then:

1) Open a elevated command prompt i.e open cmd and run as administrator

2) In the command prompt, type mcbuilder and press Enter.

3) When the command window closes, restart the computer.

15. You can delete the winlogon.exe_original.mui that ResHacker created if you like since you can easily do OPTION TWO below to restore the default settings.


Thats it!! Hope you have done successfully !!

Saturday, November 26, 2011

How To Use Windows 7 Without Activation


Don’t have money to buy orginal windows 7 with activation key?

Here is simple windows 7 trick that increases the trial preriod from 30 days to 120 days. Before you try this trick you should check out my other blog Windows 7 Activation  that offers free windows 7 activation .It may work for you.
The activation process will complete successfully only if the software has not been previously activated, such as on a different machine. If activation isn’t completed within the trial period, Microsoft products temporarily shut down some of their features.Microsoft makes Activation was toughened up for Windows 7/Vista, however; after the grace period, non activated computers running Windows Vista drop into what Microsoft calls “Reduced Functionality” Mode(RFM)
Here we go some simple steps to increase activation time.

1)Open Command prompt (cmd) , start , in search box type cmd
2) Right click on cmd and run as administrator

3)Type following command in cmd , slmgr -rearm and press enter


That is it , you can use this commend for 3 times, so that you will get 120 days of trial period(30+30+30+30=120)