Pages

Wednesday, January 21, 2015

How to set up or delete subdomains (Plesk 11) : Web Hosting at myHosting

What is Sub-domain?

A sub-domain is a domain that is part of a larger domain in the Domain Name System (DNS) hierarchy.


Today fellow webmasters create domains but I was pointless; when I  newly started hosting my websites on Sub-domains.So I thought, Why not make it simpler ? So you do not ask or stop waiting for support of hosting for long time. So Here I explain to set up and delete the sub-domain with hosting partner as myhosting. This article will help you to create sub domains of a domain. with SSL support or without it.

Creating Subdomains with Plesk Panel(11)
I hope this will definitely help you

Saturday, November 17, 2012

New Skype Hack Found - Only Requires Your Email Address


A major new Skype hack has started to appear that only requires the hacker to know your email address (username isn’t required) in order to exploit your Skype account.

The hack is made possible due to Skype’s crappy password recovery proceedures which is being used to gain access to users Skype accounts. The vulnerability was first reported to Skype about 3 months ago according to a Russian site that disclosed the hack  this week.

To temporarily address this vulnerability, users are being advised to change their primary email address associated with their Skype accounts as soon as possible. Here is how to do that: (Note that I was only able to get this to work using Internet Explorer).

Firstly, log into your account at Skype.com (not via the program)

Next select your profile


Now scroll down to your contact details and click on Add email address


when you save this seeting a pop-up message will appear asking for you to re-enter your password. Enter it and Click (with your mouse) the Enter button in the pop-up window. If you simply hit the Enter key on your keyboard this will result in an error.


Now hit Edit again and delete your old primary email address and hit Save.

You are Done.

Now you are using another guy's email address for skype account without his permission!!
Now if you change your account details the account  becomes fake.

[Update] Skype are now aware of this issue and have temporarily disabled the ability to reset your passwords until they have patched this. They have released the following message on their support forums:
We’ve been informed of a vulnerability in our password reset process, which could compromise the security of our users. We have temporarily disabled the password reset process for Skype accounts to prevent this vulnerability from being exploited.
Security is of the highest importance to us and we are working on getting this fixed as soon as possible.
We apologize for any inconvenience caused to users who need to reset their passwords, but our priority is protecting the integrity of user accounts
 But they posted a solution for this on this wednesday, But still vulnerability persists as I tested it with my own account today(1 hrs ago before posting this article).


Note: Please donot exploit any one;this article  is only for education purposes so that when you build a website you must take care of these things. **Tech@cks will not be responsible for your any false activities.

Tuesday, November 13, 2012

How to Eliminate the Time-Wasting Lock Screen in Windows 8


When you first boot Windows 8, change users or wake from sleep, you’re presented with a lock screen that you must drag up and away (or click to close) before you reach the login prompt. While having the weather, time and number of emails displayed on a lock screen makes sense on tablets and phones, it’s a waste of time on PCs where users just want to see a password prompt and log in.

Disabling this productivity-robbing lock screen is really easy, if you know how to find the right control panel menu.
  1. Hit Window Key + R. A run dialog box appears.
  2. Type gpedit.msc into the box and hit Ok. The Local Group Policy Editor appears

    3.    Navigate to Computer Configuration -> Administrative Tools -> Control Panel ->   Personalization in the left pane of the window


4. Double click (or tap) on Do not display the lock screen. Another dialog box appears.


5. Select Enabled and click Ok.


Now restart you computer and you will see the changes.

Tuesday, October 9, 2012

How to Crack a Wi-Fi Network’s WEP Password with BackTrack

Today we're going to run down, step-by-step, how to crack a Wi-Fi network with WEP security turned on. But first, a word: Knowledge is power, but power doesn't mean you should be a jerk, or do anything illegal. Knowing how to pick a lock doesn't make you a thief. Consider this post educational, or a proof-of-concept intellectual exercise.

Dozens of tutorials on how to crack WEP are already all over the internet using this method. Seriously—Google it. This ain't what you'd call "news." But what is surprising is that someone like me, with minimal networking experience, can get this done with free software and a cheap Wi-Fi adapter. Here's how it goes.

What You'll Need

Unless you're a computer security and networking ninja, chances are you don't have all the tools on hand to get this job done. Here's what you'll need:

  • A BackTrack Live CD. The Linux Live CD that lets you do all sorts of security testing and tasks. Download yourself a copy of the CD and burn it, or load it up in VMware to get started.


  • A nearby WEP-enabled Wi-Fi network. The signal should be strong and ideally people are using it, connecting and disconnecting their devices from it. The more use it gets while you collect the data you need to run your crack, the better your chances of success.


  • Patience with the command line. This is an ten-step process that requires typing in long, arcane commands and waiting around for your Wi-Fi card to collect data in order to crack the password. Like the doctor said to the short person, be a little patient.

  • Crack That WEP


    To crack WEP, you'll need to launch Konsole, BackTrack's built-in command line. It's right there on the taskbar in the lower left corner, second button to the right. Now, the commands.

    First run the following to get a list of your network interfaces:

    airmon-ng

    The only one I've got there is labeled ra0. Yours may be different; take note of the label and write it down. From here on in, substitute it in everywhere a command includes (interface).

    Now, run the following four commands. See the output that I got for them in the screenshot below.


    airmon-ng stop (interface)
    ifconfig (interface) down
    macchanger --mac 00:11:22:33:44:55 (interface)
    airmon-ng start (interface)


     If you don't get the same results from these commands as pictured here, most likely your network adapter won't work with this particular crack. If you do, you've successfully "faked" a new MAC address on your network interface, 00:11:22:33:44:55.

    Now it's time to pick your network. Run:

    airodump-ng (interface)

    To see a list of wireless networks around you. When you see the one you want, hit Ctrl+C to stop the list. Highlight the row pertaining to the network of interest, and take note of two things: its BSSID and its channel (in the column labeled CH), as pictured below. Obviously the network you want to crack should have WEP encryption (in the ENC) column, not WPA or anything else.

    Like I said, hit Ctrl+C to stop this listing. (I had to do this once or twice to find the network I was looking for.) Once you've got it, highlight the BSSID and copy it to your clipboard for reuse in the upcoming commands.

    Now we're going to watch what's going on with that network you chose and capture that information to a file. Run:

    airodump-ng -c (channel) -w (file name) --bssid (bssid) (interface)

    Where (channel) is your network's channel, and (bssid) is the BSSID you just copied to clipboard. You can use the Shift+Insert key combination to paste it into the command. Enter anything descriptive for (file name). I chose "yoyo," which is the network's name I'm cracking.


    You'll get output like what's in the window in the background pictured below. Leave that one be. Open a new Konsole window in the foreground, and enter this command:

    aireplay-ng -1 0 -a (bssid) -h 00:11:22:33:44:55 -e (essid) (interface)

    Here the ESSID is the access point's SSID name, which in my case is yoyo. What you want to get after this command is the reassuring "Association successful" message with that smiley face.


    You're almost there. Now it's time for:

    aireplay-ng -3 -b (bssid) -h 00:11:22:33:44:55 (interface)

    Here we're creating router traffic to capture more throughput faster to speed up our crack. After a few minutes, that front window will start going crazy with read/write packets. (Also, I was unable to surf the web with the yoyo network on a separate computer while this was going on.) Here's the part where you might have to grab yourself a cup of coffee or take a walk. Basically you want to wait until enough data has been collected to run your crack. Watch the number in the "#Data" column—you want it to go above 10,000. (Pictured below it's only at 854.)

    Depending on the power of your network (mine is inexplicably low at -32 in that screenshot, even though the yoyo AP was in the same room as my adapter), this process could take some time. Wait until that #Data goes over 10k, though—because the crack won't work if it doesn't. In fact, you may need more than 10k, though that seems to be a working threshold for many.


    Once you've collected enough data, it's the moment of truth. Launch a third Konsole window and run the following to crack that data you've collected:

    aircrack-ng -b (bssid) (file name-01.cap)

    Here the filename should be whatever you entered above for (file name). You can browse to your Home directory to see it; it's the one with .cap as the extension.

    If you didn't get enough data, aircrack will fail and tell you to try again with more. If it succeeds, it will look like this:

    The WEP key appears next to "KEY FOUND." Drop the colons and enter it to log onto the network.


    So we are done!

    Thursday, February 9, 2012

    How to make your system(Windows 7) more secure like Linux

    Do you ever think can I make my login secure like Linux ? As Linux asks username and password before logon. Have you thought can it is possible in Windows 7?
    So here it is.

    1)Open local policy editor by the  help of start button.
    2)Click Local policy ->Security policy -> Do not display last user name.(see fig)


    3) Now double click on Do not display last user name and a pop comes out click Enabled , then ok.

    You'll see the effect from the next logon.

    I hope you'll like it.

    Sunday, December 25, 2011

    Using Malwares For Hacking

    ProRat
    To show you an example of a malicious program, I will use a well known Windows Trojan, ProRat.

    1. Download ProRat. Once it is downloaded right click on the folder and choose to extract it. A password prompt will come up. The password will be "
    pro".
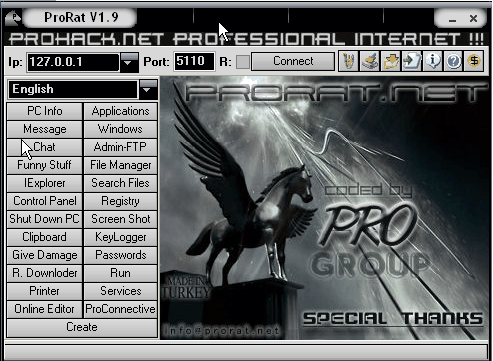
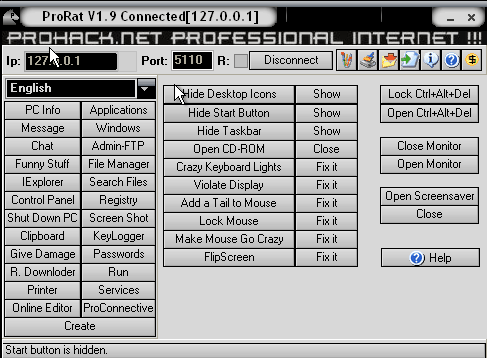
    2. Open up the program. You should see the following:


    3. Next we will create the actual Trojan file. Click on Create and choose Create ProRat Server.

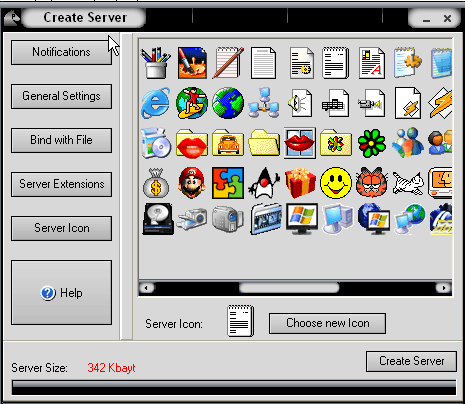
    4. Next put in your IP address so the server could connect to you. If you don’t know your IP address click on the little arrow to have it filled in for you automatically. Next put in your e-mail so that when and if a victim gets infected it will send you a message. We will not be using the rest of the options.


    5. Click on the General Settings button to continue. Here we will choose the server port the program will connect through, the password you will be asked to enter when the victim is infected and you wish to connect with them, and the victim name. As you can see ProRat has the ability to disable the windows firewall and hide itself from being displayed in the task manager.

    6. Click on the Bind with File button to continue. Here you will have the option to bind the trojan server file with another file. Remember a trojan can only be executed if a human runs it. So by binding it with a legitimate file like a text document or a game, the chances of someone clicking it go up. Check the bind option and select a file to bind it to. In the example I will use an ordinary text document.


    7. Click on the Server Extensions button to continue. Here you choose what kind of server file to generate. I will stick with the default because it has icon support, but exe’s looks suspicious so it would be smart to change it.


    8. Click on Server Icon to continue. Here you will choose an icon for your server file to have. The icons help mask what the file actually is. For my example I will choose the regular text document icon since my file is a text document.


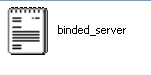
    9. Finally click on Create Server to, you guessed it, create the server file. Below is what my server file looks like.


    10. A hacker would probably rename it to something like "Funny Joke" and send it as an attachment to some people. A hacker could also put it up as a torrent pretending it is something else, like the latest game that just came out so he could get people to download it.

    11. Now, I will show you what happens when a victim installs the server onto his computer and what the hacker could do next.

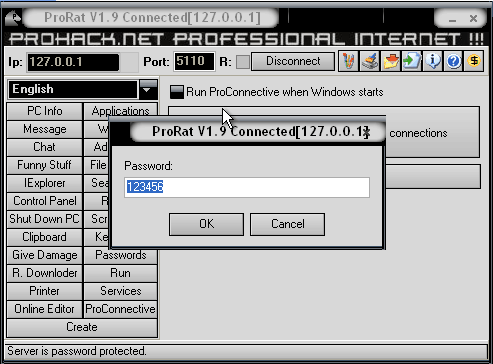
    12. I’m going to run the server on my own computer to show you what would happen. Once I run it the trojan will be installed onto my computer in the background. The hacker would then get a message telling him that I was infected. He would then connect to my computer by typing in my IP address, port and clicking Connect. He will be asked for the password that he made when he created the server. Once he types it in, he will be connected to my computer and have full control over it.


    13. Now the hacker has a lot of options to choose from as you can see on the right. He has access to all my computer files, he can shut down my pc, get all the saved passwords off my computer, send a message to my computer, format my whole hard drive, take a screen shot of my computer, and so much more. Below I’ll show you a few examples.


    14. The image below shows the message I would get on my screen if the hacker chose to message me.


    15. Below is an image of my task bar after the hacker clicks on Hide Start Button.
                                

    16. Below is an image of what the hacker would see if he chose to take a screen shot of the victims screen.


    As you saw in the above example, a hacker can do a lot of silly things or a lot of damage to the victim. ProRat is a very well known trojan so if the victim has an anti-virus program installed he most likely won’t get infected. Many skilled hackers can program their own viruses and Trojans that can easily bypass anti-virus programs.

    Countermeasures:
    There are a couple things you can do to prevent yourself from being infected by the malware discussed in this post.

    1. Make sure you have good and up-to-date anti-virus software installed on your computer. Also if there is an automatic update option on your anti-virus software, make sure it is enabled.

    2. Make sure you have a firewall installed on your computer and make sure that it is actually enabled. Firewalls protect against unauthorized inbound and outbound connections.


    Thursday, December 15, 2011

    How to Change the "Shutting down.." Text Message at Shutdown in Windows 7 and Vista

    Change "Shutting down..." Text Message at Shutdown.

                                               Before

    After

    Now lets coming to point -"How to do this??"
    Follow the steps below to do this-
    1. In Windows Explorer, navigate to C:\Windows\System32\en-US\wininit.exe.mui. (see screenshot below)

    Note Note


    The en-US folder is in English Windows 7 copies. If you have a non-English Windows 7 copy, then this folder will have a different name reflecting your language instead.The table below are a few of the most common ones.
    Folder Name Language
    da-DK Danish
    en-GB English-Great Britian
    en-US English-U.S.
    fi-FI Finnish
    fr-FR French
    de-DE German
    el-GR Greek
    it-IT Italian
    no-NO Norwegian
    es-ES Spanish
    sv-SE Swedish


    2. Take Ownership of the wininit.exe.mui file with your user account, and set it's permissions to Allow your user account Full Control. Close Windows Explorer when finished.


    3. Copy this wininit.exe.mui file to your desktop.

    4. If you have not already, download and install Resourse Hacker.

    5. Right click on the Resource Hacker shortcut in Start Menu - All Programs, then click on Run as administrator. (see screenshot below)


    6. If prompted by UAC then click on Yes (Windows 7) or Continue (Vista).

    7. In Resource Hacker, click on File and Open. (see screenshot below)


    8. In Resource Hacker, select All Files (*.*) in the Files of type drop down box, navigate to and select the copied wininit.exe.mui file on the desktop,then click on the Open button. (see screenshot below)


    9. In the left pane of Resource Hacker, expand String Table, and 63, to 1003. (see screenshot below)


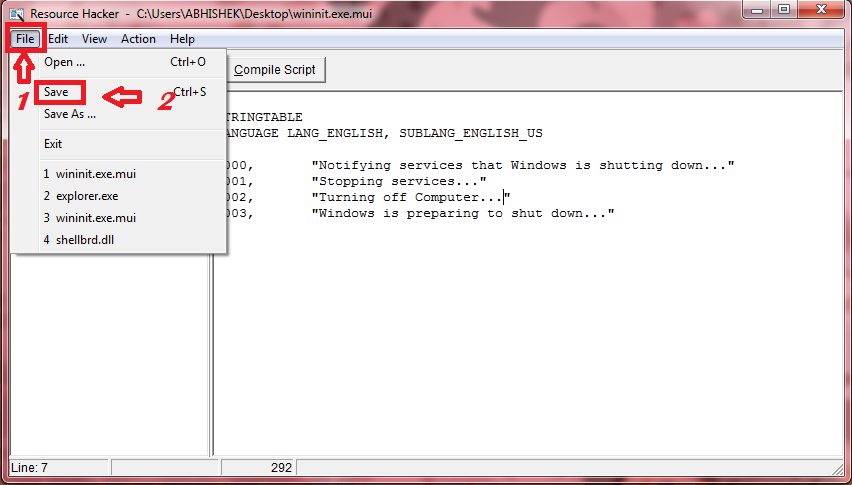
    10. In the right pane of 1002, replace the Shutting down... text in quotes at 1003 with the text you want instead (ex: Turning off computer...) within quotes, then click on the Compile Script button. (see screenshot above and below)

    1
    1. Click on File and Save, then close Resource Hacker. (see screenshot below)

    12. Copy the modified wininit.exe.mui file on your Desktop, and Paste it into the C:\Windows\System32\en-US folder from step 1. (see screenshot below step 1)
    NOTE: The en-US folder is in English Windows 7 copies. If you have a non-English Windows 7 copy, then this folder will have a different name reflecting your language instead.

    13. Click on Copy and Replace. (see screenshot below)

    14. Restart the computer and log in to see the changes made.

    Tip Tip
    If the "Shutting down..." message did not change at shutdown (in second shutdown) after your changes from above, then:

    1) Open a elevated command prompt i.e open cmd and run as administrator

    2) In the command prompt, type mcbuilder and press Enter.

    3) When the command window closes, restart the computer.

    15. You can delete the wininit.exe_original.mui that ResHacker created if you like since you can easily do OPTION TWO below to restore the default settings.


    Thats it!! Hope you have done successfully !!

    Saturday, December 10, 2011

    How to Change the Start Menu Button in Windows 7

    Changing your Start button is very easy and simple.

    Steps to change your Start button-

    1. Download the Windows 7 Start Orb Changer from the link.
    2. Run the tool as administrator.
      Windows 7 Start Orb Changer
    3. Click Change.
      Windows 7 Start Orb Changer
    4. Select the start orb and click Open. You can get some orbs from these links:1, 2, 3, 4, 5, 6, 7, 8, 9, 10, 11, 12.(Save the orbs with extension of .bmp or directly download from the link)
         5. The Windows Explorer will now restart automatically and you will be able to see the new start orb/button which you choose. Click OK.


    To restore the original start orb click Restore.

    Friday, December 9, 2011

    How to Change the "Welcome" Text Message at Log On in Windows 7 and Vista

    Change "Welcome" Text Message at Log On
    1. In Windows Explorer, navigate to C:\Windows\System32\en-US\winlogon.exe.mui. (see screenshot below)
    Note Note

    The en-US folder is in English Windows 7 copies. If you have a non-English Windows 7 copy, then this folder will have a different name reflecting your language instead.The table below are a few of the most common ones.
    Folder Name Language
    da-DK Danish
    en-GB English-Great Britian
    en-US English-U.S.
    fi-FI Finnish
    fr-FR French
    de-DE German
    el-GR Greek
    it-IT Italian
    no-NO Norwegian
    es-ES Spanish
    sv-SE Swedish


    2. Take Ownership of  the winlogon.exe.mui file with your user account, and set it's permissions to Allow your user account Full Control. Close Windows Explorer when finished.


    3. Copy this winlogon.exe.mui file to your desktop.

    4. If you have not already, download and install Resourse Hacker.

    5. Right click on the Resource Hacker shortcut in Start Menu - All Programs, then click on Run as administrator. (see screenshot below)

     6. If prompted by UAC then click on Yes (Windows 7) or Continue (Vista).

    7. In Resource Hacker, click on File and Open. (see screenshot below)

    8. In Resource Hacker, select All Files (*.*) in the Files of type drop down box, navigate to and select the copied winlogon.exe.mui file on the desktop,then click on the Open button. (see screenshot below)


    9. In the left pane of Resource Hacker, expand String Table, and 63, to 1033. (see screenshot below)


    10. In the right pane of 1033, replace the Welcome text in quotes at both 1002 and 1005 locations with the text you want instead (ex: Hello) within quotes, then click on the Compile Script button. (see screenshot above and below)

    11. Click on File and Save, then close Resource Hacker. (see screenshot below)

    12. Copy the modified winlogon.exe.mui file on your Desktop, and Paste it into the C:\Windows\System32\en-US folder from step 1. (see screenshot below step 1)
    NOTE: The en-US folder is in English Windows 7 copies. If you have a non-English Windows 7 copy, then this folder will have a different name reflecting your language instead.


    13. Click on Copy and Replace. (see screenshot below)

    14. Restart the computer and log in to see the changes made.

    Tip Tip
    If the "Welcome" message did not change at log on after your changes from above, then:

    1) Open a elevated command prompt i.e open cmd and run as administrator

    2) In the command prompt, type mcbuilder and press Enter.

    3) When the command window closes, restart the computer.

    15. You can delete the winlogon.exe_original.mui that ResHacker created if you like since you can easily do OPTION TWO below to restore the default settings.


    Thats it!! Hope you have done successfully !!